Guide to Different Types of Commercial Roofing

As a leading contracting service in Pittsburgh, Pennsylvania, Pittsabana understands the importance of effective roofing solutions for commercial buildings. Commercial roofing systems play a crucial role in protecting the integrity of these structures while ensuring durability and longevity. In this article, we will explore the various types of commercial roofing systems available, providing insights into their features and benefits.

What is a Commercial Roofing System?

A commercial roofing system refers to the materials, components, and installation techniques used to create a weatherproof barrier on commercial buildings. These systems are designed to withstand the unique challenges of larger structures and offer superior protection against the elements. A well-designed commercial roofing system is essential for maintaining the integrity of the building and safeguarding its occupants.

Types of Commercial Roofing Systems

Built-Up Roofing (BUR)

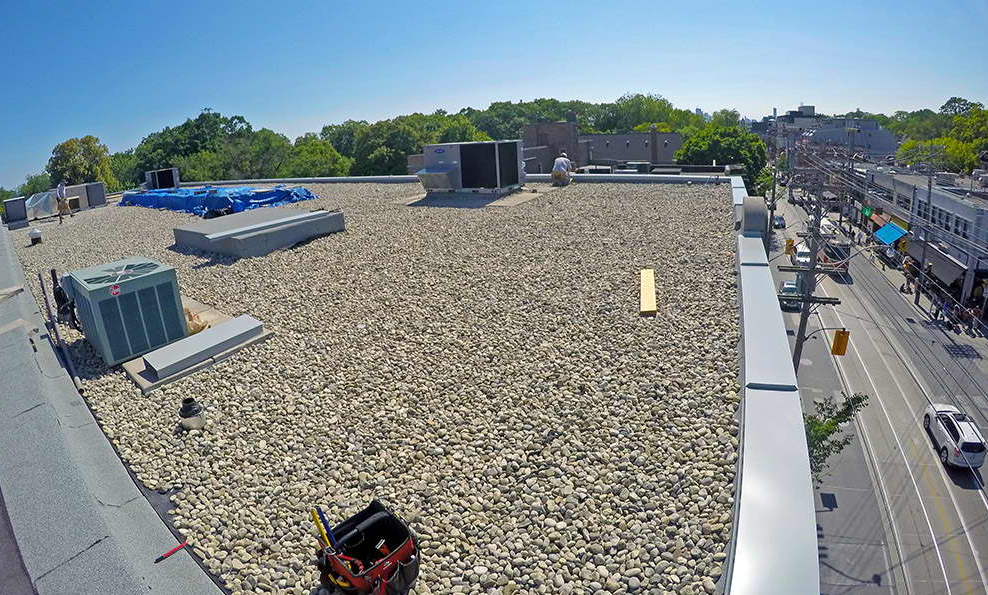
Built-Up Roofing (BUR) is one of the oldest and most reliable types of commercial roofing systems. It consists of multiple layers of bitumen (asphalt or coal tar) alternated with reinforcing fabrics, typically fiberglass or polyester. The layers are then topped with a protective coating of gravel or a reflective surface. BUR systems offer excellent durability and resistance to fire, making them ideal for commercial buildings.

Single-Ply Roofing Membrane

Single-ply roofing membranes are lightweight and versatile, making them a popular choice for commercial roof systems. There are two main types:

Thermoplastic Olefin (TPO) Roofing

TPO roofing systems are highly energy-efficient and offer exceptional resistance to UV rays and chemical exposure. They are heat-welded during installation, creating a seamless, durable, and watertight roofing surface. TPO roofs are known for their long lifespan and cost-effectiveness.

Ethylene Propylene Diene Terpolymer (EPDM) Roofing

EPDM roofing membranes are made from synthetic rubber, known for their excellent weathering characteristics and resistance to hail and ozone damage. These roofs are typically installed using adhesives or mechanically fastened systems. EPDM roofs are highly durable, low-maintenance, and can last up to 30 years with proper care.

Metal Roofing

Metal roofing systems are renowned for their strength, longevity, and aesthetic appeal. They are available in various materials, including steel, aluminum, and copper. Metal roofs are lightweight, fire-resistant, and environmentally friendly. They can withstand extreme weather conditions and require minimal maintenance. Metal roofing can be installed as standing seam panels, metal shingles, or metal tiles, offering a wide range of design options.

Modified Bitumen Roofing

Modified bitumen roofing systems are a hybrid of BUR and single-ply roofing. They consist of reinforced asphalt membranes with added modifiers for enhanced durability and flexibility. Modified bitumen roofs can be installed using heat-welded, cold-applied, or self-adhered methods. These roofs offer excellent resistance to punctures, tears, and extreme weather conditions.

Green Roofing

Green roofing systems, also known as vegetative or eco-roofs, are gaining popularity due to their environmental benefits. These roofs feature a layer of vegetation, providing insulation, reducing stormwater runoff, and improving air quality. Green roofs require specialized design and installation techniques to ensure proper drainage and structural support.

Conclusion

Choosing the right commercial roofing system is crucial for the long-term performance and protection of commercial buildings. The types of commercial roofing systems discussed in this article provide a range of options to meet various needs and preferences. Whether you opt for the durability of built-up roofing, the versatility of single-ply membranes, the strength of metal roofs, the flexibility of modified bitumen, or the sustainability of green roofs, Pittsabana is equipped to deliver effective solutions tailored to your requirements. Remember, each commercial roofing system has its unique benefits, and the choice should be based on factors such as budget, building structure, climate, and desired longevity. Contact Pittsabana today to discuss your commercial roofing needs and benefit from our expertise in delivering top-notch roofing and guttering solutions.

What Happens During a Commercial Roof Inspection

As a leading contracting service in Pittsburgh, Pennsylvania, Pittsabana is dedicated to providing effective solutions for all your roofing and guttering needs. One crucial aspect of maintaining a commercial roof is regular inspections. In this article, we will delve into the various aspects of a commercial roof inspection, shedding light on the process and its importance. From examining the interior to walking the roof, taking core samples to generating a detailed report, we will cover all the essential elements involved. So, let’s explore what happens during a commercial roof inspection.

Commercial Roof Inspection Starts from the Inside

A thorough commercial roof inspection begins by assessing the interior of the building. The roofing inspector will examine the ceilings, walls, and any other accessible areas for signs of moisture intrusion, leaks, or water stains. They will also look for cracks, mold growth, or any other visible damage that may affect the integrity of the roof.

The inspector will inspect the attic space to check for proper ventilation and insulation, which are crucial for maintaining a healthy roof. Any issues with ventilation or insulation can lead to moisture buildup, which can result in damage to the roof structure.

Furthermore, the interior inspection involves checking for signs of pest infestation, as pests can cause significant damage to the roof and its components. Proper identification of these issues during the inspection helps address them promptly and prevent further damage.

Commercial Roof Inspection Includes Walking the Roof 

After examining the interior, the commercial roofing inspector will proceed to physically inspect the roof. This step involves carefully walking the entire roof surface, checking for signs of damage, wear and tear, or any other issues that may compromise its integrity.

During the roof walk, the inspector will inspect the roofing materials, such as shingles, tiles, or membranes, to identify any visible damage or deterioration. They will also examine the flashing, gutters, downspouts, and other roof components to ensure they are in good condition and functioning properly.

The roofing inspector will pay close attention to areas prone to leaks, such as valleys, vents, skylights, and chimneys. These vulnerable points require meticulous inspection to identify any potential sources of water infiltration.

To ensure a comprehensive inspection, the roofing professional will inspect the roof for signs of ponding water, debris accumulation, or blocked drainage systems. Proper water drainage is crucial for preventing roof damage and preserving its longevity.

Commercial Roof Inspection Includes Taking a Few Core Samples

In some cases, a commercial roof inspection may involve taking core samples. Core samples are small sections of the roofing material that are extracted for laboratory analysis. This process helps determine the condition of the roof layers, identify potential issues, and assess the remaining lifespan of the roof.

During the core sampling process, the inspector will carefully select specific areas on the roof and extract small samples of the roofing material. These samples are then sent to a laboratory for further analysis, where experts evaluate the material’s composition, strength, and potential signs of damage.

Core sampling provides valuable insights into the roof’s condition, allowing for proactive maintenance and targeted repairs if needed. It helps identify hidden issues that may not be visible during a regular visual inspection, enabling a more accurate assessment of the roof’s overall health.

Commercial Roof Inspection Includes a Report

Following the completion of the inspection, a commercial roof inspector will compile a detailed report that summarizes their findings. The report serves as a valuable reference for building owners, property managers, or contractors, providing a comprehensive overview of the roof’s condition.

The inspection report typically includes information about the roof’s current state, identified issues, recommended repairs or maintenance, and an estimation of the roof’s remaining lifespan. It may also include photographs, core sample analysis results (if applicable), and any other relevant documentation.

The report helps stakeholders make informed decisions regarding necessary repairs, budgeting for future maintenance, or planning for roof replacement. It provides a roadmap for addressing existing problems and mitigating potential risks to ensure the longevity and performance of the commercial roof.

How Long Does a Commercial Roof Inspection Take? 

The duration of a commercial roof inspection depends on various factors, including the size, complexity, and accessibility of the roof. Generally, a thorough inspection can take anywhere from a few hours to a full day.

The inspector needs sufficient time to carefully examine the interior, walk the roof, and perform any additional tasks like core sampling. It is crucial not to rush the inspection process, as overlooking even minor issues can lead to significant problems down the line.

Factors such as weather conditions, roof accessibility, and the presence of multiple buildings or roof sections can also influence the inspection timeline. To ensure accuracy and attention to detail, it is essential to allocate adequate time for the inspection.

Conclusion

In summary, a commercial roof inspection is a comprehensive process that involves thorough examination of both the interior and exterior components. From inspecting the interior for signs of damage and moisture intrusion to walking the roof surface, taking core samples, and generating a detailed report, each step contributes to a holistic assessment of the roof’s condition. Regular commercial roof inspections play a vital role in identifying potential issues, allowing for timely repairs and proactive maintenance. By investing in professional commercial roof inspections, Pittsabana ensures the longevity, performance, and protection of your commercial roofing system.

Problems with Tar and Gravel Commercial Roofs

Welcome to Pittsabana, your premier contracting services in Pittsburgh, Pennsylvania, offering effective solutions for all your roofing and guttering needs. In this article, we will explore the problems associated with tar and gravel commercial roofs. Tar and gravel roofs, also known as built-up roofs, have been widely used for their durability and weather resistance. However, they are not without their issues. We will delve into the installation process, highlight the top problems often encountered with these roofs, and explore alternative roofing options. Read on to discover how Pittsabana can help you with your commercial roofing requirements.

What is a tar and gravel commercial roof?

A tar and gravel commercial roof, also referred to as a built-up roof (BUR), is a traditional roofing system widely used in commercial buildings. It consists of multiple layers of bitumen (tar) and reinforcing fabrics, topped with a layer of aggregate gravel. The multiple layers create a strong and durable barrier against the elements, making it a popular choice for commercial applications.

Tar and gravel roof installation

The installation process for a tar and gravel roof, also known as a built-up roof (BUR), involves several steps. Here is a comprehensive list of the typical installation process:

1. Roof Preparation:

   – Ensure the roof surface is clean, free from debris, and properly prepared for installation.

   – Inspect the roof for any existing damage, such as leaks, cracks, or weak spots, and address them before proceeding.

2. Installing Base Layer:

   – Apply a base layer of bitumen (tar) on the prepared roof surface using a roofing mop or sprayer.

   – Spread the bitumen evenly to create a solid foundation for the multiple layers that will follow.

   – The thickness of the base layer may vary depending on the specific project requirements.

3. Placing Reinforcing Fabrics:

   – Embed reinforcing fabrics, such as fiberglass or polyester, into the hot bitumen layer.

   – Roll out the fabric sheets over the bitumen and use a roofing mop to press them firmly into place.

   – Ensure the fabrics are completely saturated and adhere well to the bitumen layer.

4. Adding Additional Layers:

   – Apply successive layers of bitumen and reinforcing fabrics, typically in a two or three-ply system.

   – Heat each layer of bitumen to a suitable temperature using a roofing torch or kettle, then spread it evenly.

   – Embed the reinforcing fabrics into each bitumen layer, ensuring proper adhesion and consolidation.

5. Smoothing and Tapering:

   – Use a roofing mop or trowel to smooth the surface of each bitumen layer, removing any air pockets or wrinkles.

   – Create a gradual taper on the roof surface to facilitate proper water drainage.

   – Ensure the final surface is level and uniform, providing a suitable base for the gravel layer.

6. Applying Gravel Layer:

   – Spread a layer of aggregate gravel evenly over the hot bitumen surface.

   – The gravel acts as a protective barrier, shielding the roof from UV rays and helping with water runoff.

   – Use rakes or shovels to distribute the gravel uniformly, ensuring adequate coverage across the entire roof area.

7. Final Inspection:

   – Conduct a thorough inspection of the completed tar and gravel roof to check for any defects, inconsistencies, or potential issues.

   – Address any remaining imperfections, such as loose gravel or uneven surfaces, before concluding the installation process.

Please note that the installation process may vary slightly depending on the specific project requirements, local building codes, and the expertise of the roofing contractor. It is always recommended to consult with a professional roofing contractor for a precise and accurate installation process tailored to your specific project.

Top Problems with Tar and Gravel Commercial Roofs

1. Water leakage:

One of the most common problems with tar and gravel roofs is water leakage. Over time, the multiple layers of the roof can develop cracks or gaps, leading to water penetration. Additionally, the gravel layer can shift or erode, exposing vulnerable areas to potential leaks. Regular inspections and maintenance are crucial to identify and address these issues promptly.

2. Ponding water:

Flat or low-slope tar and gravel roofs are susceptible to ponding water, where water accumulates and forms puddles. Ponding water can exert excessive stress on the roof structure, compromising its integrity. It can also contribute to leaks, accelerated deterioration, and the growth of algae or mold. Proper drainage systems and regular roof inspections can help mitigate ponding water issues.

3. Weight and structural concerns:

Tar and gravel roofs are relatively heavy due to the multiple layers of bitumen and the gravel topping. This additional weight can pose a strain on the building’s structure, particularly in older or weaker buildings. It is crucial to ensure that the structure can support the weight of the roof and take necessary precautions during installation or repairs.

4. Maintenance challenges:

Maintaining tar and gravel roofs can be challenging. The gravel layer may become dislodged or compacted, leading to uneven protection and potential damage. Regular maintenance, such as debris removal, gravel reapplication, and patching any cracks or blisters, is essential to prolong the lifespan of the roof.

5. Limited insulation:

Tar and gravel roofs have limited insulation properties compared to modern roofing systems. This can result in higher energy costs as the building’s heating or cooling systems need to compensate for heat transfer. Supplementing the roof with additional insulation or considering alternative roofing options can help improve energy efficiency.

Alternatives to Tar and Gravel Roofs

Considering the issues associated with tar and gravel commercial roofs, it’s worth exploring alternative roofing options. Here are a few alternatives that offer improved performance and durability:

1. Single-ply membrane roofs:

Single-ply membranes, such as EPDM (ethylene propylene diene terpolymer) or TPO (thermoplastic olefin), offer excellent weather resistance, durability, and ease of installation. These roofs consist of a single layer of synthetic material, eliminating the need for multiple bitumen layers and gravel topping.

2. Modified bitumen roofs:

Modified bitumen roofs combine the durability of traditional built-up roofs with the convenience of modern roofing materials. These roofs use reinforced sheets of modified bitumen, typically installed in a two-ply system. They offer enhanced flexibility, strength, and resistance to temperature fluctuations.

3. Roof coatings:

Applying a reflective roof coating can significantly improve the performance of an existing tar and gravel roof. These coatings create a seamless, waterproof barrier that helps regulate the building’s temperature and extends the roof’s lifespan. Additionally, they can reduce energy costs by reflecting sunlight and reducing heat absorption.

Conclusión

In summary, while tar and gravel roofs have been widely used for commercial applications, they come with their fair share of problems. Water leakage, ponding water, weight concerns, maintenance challenges, and limited insulation are among the common issues associated with these roofs. Pittsabana understands these challenges and offers effective roofing solutions tailored to your specific needs. Consider exploring alternatives such as single-ply membrane roofs, modified bitumen roofs, or roof coatings to address the problems and improve the longevity and performance of your commercial roof. Contact Pittsabana today for expert roofing and guttering services in Pittsburgh, Pennsylvania

Pittsabana Contracting Services LLC